Getting Back Into Nordic Skiing

It’s never too late to start anew
By Karen Sykes
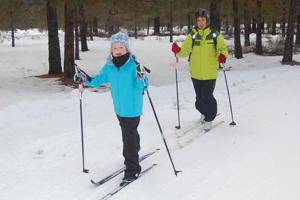
Photo at right: The groomed tracks near the Fish Hatchery in Leavenworth are a perfect place to start, or kick-start, your cross-country ski habit. Photo by Carolyn Price
The last time I cross-country skied was in 2000 during a Seattle snowstorm. I skied from Seattle’s Queen Anne neighborhood to Magnolia, about a four-miler round-trip on hilly streets with light snow—I haven’t skied since.
The boots were tight. The skis were old; I was old. I never replaced the equipment and didn’t go skiing again. But with each passing year and summer hiking in my blood, the Nordic bug struck again.
My partner, Bob, and I knew much had changed over the last 11 years so we decided to give it another go—this time with new equipment that fit. We also agreed we needed to start a pre-season conditioning program.
I’ve learned a lot from my foray back into cross-country skiing, so I hope the tips and information below might prove useful to those new to cross-country skiing or those (like us) getting back into the sport after several years.
What type of skier are you?
In our hunt to find equipment that would help us ski better and not injure ourselves, we visited several retail stores to gather pre-purchase information. Again and again, we were asked what kind of cross-country skiing were we going to do?
I remembered we had preferred skiing on logging roads because they were less crowded and wider than single-track or groomed trails with more room to fall down, which we did plenty of. We found out there’re fancy names—with equipment made for each—for different kinds of Nordic skiing:
Ski touring—this is a broad category but is generally mellow and well-suited to those who enjoy hiking and watching nature. Skiing logging roads is just one example.
Trail skiing—places more emphasis on fitness but is also fun—these include groomed trails (a flat surface with grooves on each side of the trail). This attracts beginners as well as more advanced skiers looking for speed and a predictable surface to ski on. Many Sno-Parks and Nordic resorts offer track skiing, ranging from easy to challenging.
Backcountry skiing—this type of skiing is for the more adventuresome skier. You create your own track in the snow on a variety of terrain ranging from gentle country to climbing and skiing down a mountain. Backcountry skiing goes beyond roads and tracks and often involves route-finding and/or multi-day travel.
Telemark—is poetry in motion—in other words well beyond our ability. Learning how takes practice and patience.
Whatever your skill level, remember, it’s all about having fun. Don’t fret about right/wrong techniques but if skiing becomes more of a struggle than fun, then consider taking a lesson (see Nordic Resources, page 18).
Equipment
The choices you make when it comes to buying equipment depend on the kind of skiing you want to do. Specifics are beyond the scope of this article but here are a few guidelines.
In general, skis are shorter and wider today (and so are some of us). Hint: longer skies glide better but it’s harder to make turns.
Start out with properly sized waxless skis. As your skills progress try more specialized equipment (ski mountaineering and telemark gear are for advanced skiers). If you don’t know what length of ski you need, there are sizing charts and trained retail salespeople to help you figure that out.
Make sure boots fit—skis should have manual step-in bindings. Bindings are the system that attaches boots to the skis. Step-in bindings hold the toes of the boots on the skis leaving the heel free to kick and propelling the skier forward. Buy bindings and boots together because not all manufacturers’ equipment is compatible. Boots should be at least ankle high. Poles can be adjustable or fixed length.
Before You Go: Be Prepared
In addition to the 10 Essentials, take duct tape. It won’t fix a compound fracture but it will protect a blister or hold skis and poles together. Your pack should include medications and/or other personal essentials. A map, compass (or GPS) can’t help if you don’t know how to use them. If you lack route-finding skills, stick to marked trails.
Dress in layers: polypropylene tops/bottoms/underwear, down/fleece or wool shirt/jacket/vest, waterproof shells, hats, gloves and a dry set of extra clothing. To keep warm add a hat, another layer or dry gloves (carry spares). Chemical hand-warmers are great—they weigh little and provide quick warmth. Take an insulated pad to sit on for rest/lunch breaks.
Don’t forget waterproof sunscreen and sunglasses for sun protection. Apply sunscreen under chin, back of neck, nose and tips of ears. Protect your lips. I forgot to do so once and my lips were so swollen I looked like a candidate for a horror movie. Some lip-balms have SPF protection.
WWW—(no, that’s not a website!). Tell someone where you are going, when you’ll return and whom to call; (don’t rely on cell phones—reception can be spotty).
For lunch take something warm (a Thermos of soup, tea or chocolate), food that won’t freeze and is easy to handle. Energy gels are handy—they offer energy for about an hour. Forget bananas—ever try to peel a frozen banana with wool gloves or frozen fingers? Skip the diet. Enjoy those M&Ms—fat helps keep you warm and sugar provides short-term energy. Drink water—even if you’re not thirsty. Carry emergency food but make sure it’s something you like to eat.
Know your skill set
Remember: no two people’s abilities and pace are alike. In a mixed group, Nordic Centers are a good place for an outing with friends. Slower-paced skiers can take shelter inside if their more experienced companions are not yet ready to come in from the cold.
Conditioning
Get or stay in condition. The best way to get in shape for skiing is to ski. Practice where snow conditions are ideal — not too hilly or snow too icy
or soft.
Speaking from my own experience, I suggest you develop your own falling technique. Mine is the “induced fall,” where it’s better to fall than to keep going at a speed you can’t control. Fall sideways or sit down when you feel yourself losing control — if you fight gravity you risk pulling a muscle or straining a ligament.
Where to go
Sno-Parks—yes, we know—another fee. Go ahead and grumble—we do—but it’s also nice to find your car where you left it when you’re ready to go home. Know when and where they are required.
A Sno-Park is a designated area for skiers/snowshoers to park their vehicles and you need a Sno-Park Permit to park there. Vehicles without a Sno-Park permit are likely to be ticketed and incur a hefty fine. Washington, Oregon and Idaho have reciprocity on Sno-Park permits. Log onto either Washington or Oregon state parks, then click on links with additional information including where to obtain Sno-Park Permits. (See page 15 for more on Sno-Park Permits.)
Karen Sykes is a Washington native, an avid hiker, photographer and free-lance writer.
Readers who enjoyed this article will also enjoy these!
>> Cross country skiing: Nordic Perfection
>> Private: Winter Picnics in Bend


